ostgems
10-26-2015, 10:24 AM
EAC Ripping Guide
Disclaimer: This guide was not created by me. I only updated a few points here and there to fit within this Forum. All credits go to the original creator of this guide.
Before using this RIPPING guide for the first time make sure you have followed the SETUP guide: For EAC setup instructions, use the guide found here (Thread 195866).
This guide was made for EAC version 1.0 beta 4 and above. It will not completely work with earlier versions. Versions 0.99 or earlier should use the blowfish guide.
Anything with a green outline around it is a required setting. Anything orange is required but depends on your drive. Anything unmarked is optional.
This is meant to be a no-frills guide with little extra info. A more comprehensive (but outdated) guide can be found here:
http://web.archive.org/web/20131026153421/http://blowfish.be/eac/
Step 1: Tagging
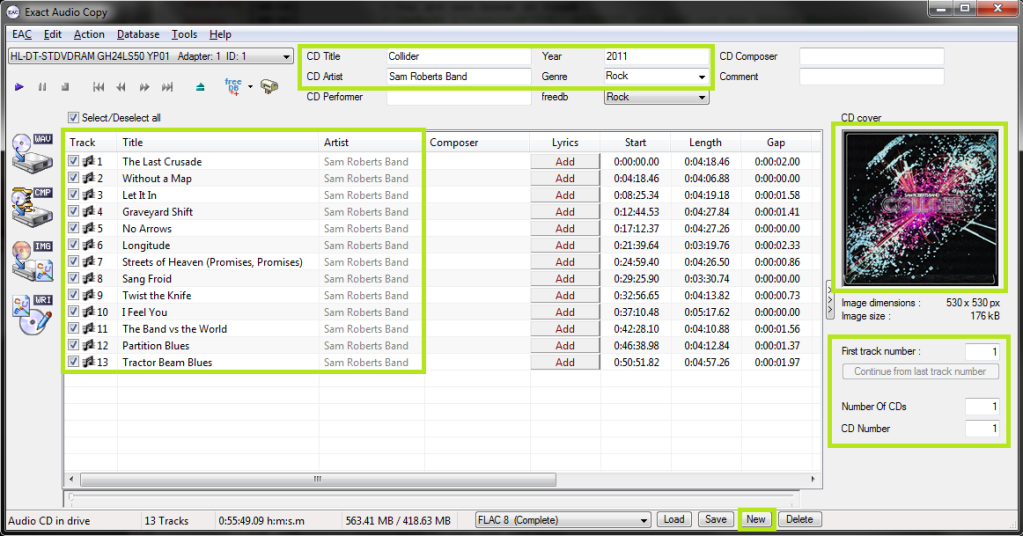
So now let's look at the main window. Be sure everything is named correctly here, as these will be the tags on your ripped files. If you're ripping a classical CD, you may wish to fill in the Composer/Performer fields.
If you want to add lyrics to the tracks, use the "Lyrics" button.
Note: I've also highlighted the "New" button where you can save your settings. This is not a necessary step each time you rip.
Step 2: Gap Detection and Cuesheets
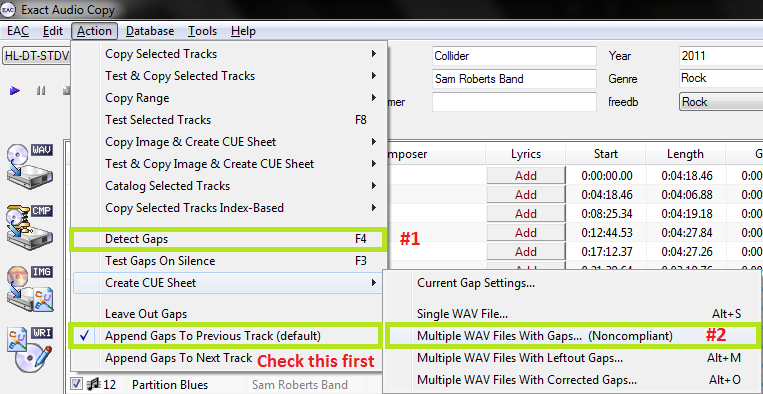
The pre-rip stuff happens here. Make sure "Append Gaps to Previous Track (default)" is checked. It should be. Next, hit the options in the order shown.
First, hit "Detect Gaps". This is very important, your rip will fail the logchecker if you do not complete this step. If the first track is highlighted in red, you have a hidden track. You'll want to look at this (http://web.archive.org/web/20130529085310/http://blowfish.be/eac/Rip/rip11-hidden.html) section of the blowfish.be guide.
Next, go to Create CUE Sheet -> Multiple WAV Files With Gaps... (Noncompliant). This is usually where I create the folder for ripping as well. Do NOT rip your tracks to any directory containing your name. You should NEVER edit a log for any reason, especially now that we have checksums. A simple C:\EAC Rips is fine.
I name my directories as follows:
Album (Year) - Artist [Label][Format]
So for example, with the album in the screenshots, it'd be
Collider (2011) - Sam Roberts Band [UMC][FLAC]
However, as long as it contains the album name and no nested folders (don't do \Artist\Album\), you're fine by the rules here.
Anyway, make the folder, save the .cue file into it. I usually just name mine Noncompliant.cue, it doesn't really matter.
A note on directory naming schemes and cuesheets:: Don't use a directory structure in your EAC filename options, unless you want to go back and edit your CUE sheet later. When you add a directory to the naming scheme, it'll put that directory path into the files. Then when someone goes to burn the files in EAC using your cuesheet, they'll be unable to do so. If you do insist on using a directory structure here, you need to go back, edit the CUE sheet in a program such as notepad, and remove the folder name from each line.
For example, a cuesheet line should look like this:
FILE "01 Last Known Surroundings.wav" WAVE
Not like this:
FILE "C:\EAC Rips\Explosions in the Sky - Take Care, Take Care, Take Care (2011) [FLAC]\01 Last Known Surroundings.wav" WAVE
Under no circumstances should you ever edit the .log file.
Step 3: Ripping
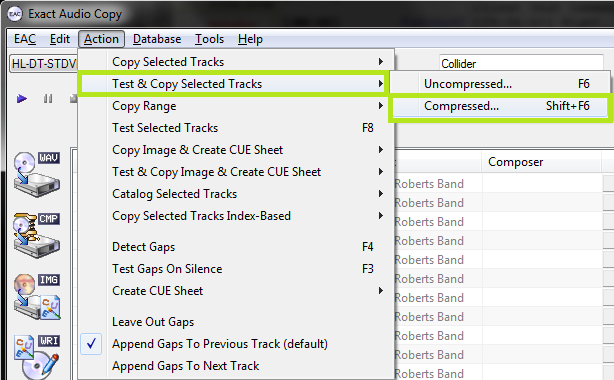
Finally, the rip itself! Make sure all the tracks are checkmarked in the main window unless there are some you don't want to rip.
Test & Copy -> Compressed.
Depending on your drive and whether or not the CD is scratched, this could take anywhere from ten minutes to four hours. Be patient.
There's a known bug in EAC where opening the file select dialog will crash the program on some machines, which would occur normally when you choose to start the rip. You can use a temporary work-around by setting a manual directory for each rip in EAC Options->Directories. You can see an example of this below. Pressing "Browse" on this screen will likely crash the program as well, so you may need to type or paste in the path by hand.
Hidden text: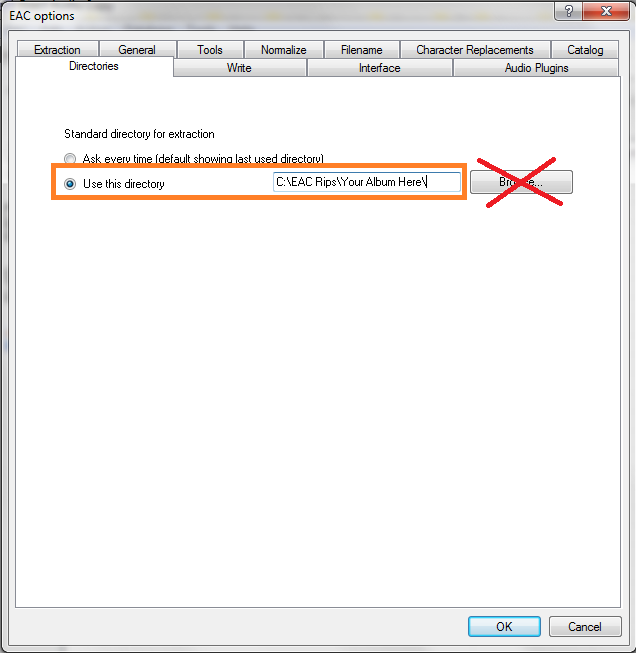
Some potential solutions to this: 1. Make sure not to have "Adobe Drive" installed (comes with CS5 e.g.).
2. If you have TortoiseSVN and/or TortoiseGit client installed: Check "Show overlays and context menu only in explorer" option in Tortoise's "Icon Overlays" settings pane.
3. Stop/quit EAC. Get an updated "cygwin1.dll". (You'll find a binary in an archive here (http://www.student.tugraz.at/thomas.plank/index_en.html), e.g..) Rename "cygwin1.dll" in EAC's subfolder "CDRDAO" to "cygwin1.old" or delete it. Unpack new "cygwin1.dll" to "CDRDAO".
4. Stop/quit EAC. Get and copy Ahead ASPI (ftp://ftp6.ahead.de/wnaspi32.dll) to EAC's folder. Start EAC, press "F9", select "Interface" tab and switch to "Installed external ASPI interface". Restart EAC and try again.
5. In EAC's menu select "File - EAC Options". Click the "Directories" tab. Switch to "Use this directory" and choose a directory you have write permissions for.
There's also a known bug with the EAC and the FLAC encoder where it will refuse to save the files to a remote network drive. This can be fixed by mapping a drive letter to said network drive which is outside the scope of this guide (google it).
Step 4: Post-Rip
So you're done!
One optional finishing touch would be to add a cover art image to the rip directory. Ideally at least 500x500 or 600x600. You can name it whatever you want but the preferred standard is simply to name it folder.jpg. Do not embed it in the music files. Just that file along with the music is enough for a majority of players to utilize.
Other than that, it never hurts to make sure your files are tagged and named properly (though they should be). Any extra stuff you want to include should be added now as well... Additional artwork, an md5 fingerprint, an info.txt file, that sort of thing. If you don't want to do any of that, it's time to find yourself an uploading guide!
-----------------------------------
For EAC setup instructions, use the guide found here (Thread 195866).
Disclaimer: This guide was not created by me. I only updated a few points here and there to fit within this Forum. All credits go to the original creator of this guide.
Before using this RIPPING guide for the first time make sure you have followed the SETUP guide: For EAC setup instructions, use the guide found here (Thread 195866).
This guide was made for EAC version 1.0 beta 4 and above. It will not completely work with earlier versions. Versions 0.99 or earlier should use the blowfish guide.
Anything with a green outline around it is a required setting. Anything orange is required but depends on your drive. Anything unmarked is optional.
This is meant to be a no-frills guide with little extra info. A more comprehensive (but outdated) guide can be found here:
http://web.archive.org/web/20131026153421/http://blowfish.be/eac/
Step 1: Tagging
So now let's look at the main window. Be sure everything is named correctly here, as these will be the tags on your ripped files. If you're ripping a classical CD, you may wish to fill in the Composer/Performer fields.
If you want to add lyrics to the tracks, use the "Lyrics" button.
Note: I've also highlighted the "New" button where you can save your settings. This is not a necessary step each time you rip.
Step 2: Gap Detection and Cuesheets
The pre-rip stuff happens here. Make sure "Append Gaps to Previous Track (default)" is checked. It should be. Next, hit the options in the order shown.
First, hit "Detect Gaps". This is very important, your rip will fail the logchecker if you do not complete this step. If the first track is highlighted in red, you have a hidden track. You'll want to look at this (http://web.archive.org/web/20130529085310/http://blowfish.be/eac/Rip/rip11-hidden.html) section of the blowfish.be guide.
Next, go to Create CUE Sheet -> Multiple WAV Files With Gaps... (Noncompliant). This is usually where I create the folder for ripping as well. Do NOT rip your tracks to any directory containing your name. You should NEVER edit a log for any reason, especially now that we have checksums. A simple C:\EAC Rips is fine.
I name my directories as follows:
Album (Year) - Artist [Label][Format]
So for example, with the album in the screenshots, it'd be
Collider (2011) - Sam Roberts Band [UMC][FLAC]
However, as long as it contains the album name and no nested folders (don't do \Artist\Album\), you're fine by the rules here.
Anyway, make the folder, save the .cue file into it. I usually just name mine Noncompliant.cue, it doesn't really matter.
A note on directory naming schemes and cuesheets:: Don't use a directory structure in your EAC filename options, unless you want to go back and edit your CUE sheet later. When you add a directory to the naming scheme, it'll put that directory path into the files. Then when someone goes to burn the files in EAC using your cuesheet, they'll be unable to do so. If you do insist on using a directory structure here, you need to go back, edit the CUE sheet in a program such as notepad, and remove the folder name from each line.
For example, a cuesheet line should look like this:
FILE "01 Last Known Surroundings.wav" WAVE
Not like this:
FILE "C:\EAC Rips\Explosions in the Sky - Take Care, Take Care, Take Care (2011) [FLAC]\01 Last Known Surroundings.wav" WAVE
Under no circumstances should you ever edit the .log file.
Step 3: Ripping
Finally, the rip itself! Make sure all the tracks are checkmarked in the main window unless there are some you don't want to rip.
Test & Copy -> Compressed.
Depending on your drive and whether or not the CD is scratched, this could take anywhere from ten minutes to four hours. Be patient.
There's a known bug in EAC where opening the file select dialog will crash the program on some machines, which would occur normally when you choose to start the rip. You can use a temporary work-around by setting a manual directory for each rip in EAC Options->Directories. You can see an example of this below. Pressing "Browse" on this screen will likely crash the program as well, so you may need to type or paste in the path by hand.
Hidden text:
Some potential solutions to this: 1. Make sure not to have "Adobe Drive" installed (comes with CS5 e.g.).
2. If you have TortoiseSVN and/or TortoiseGit client installed: Check "Show overlays and context menu only in explorer" option in Tortoise's "Icon Overlays" settings pane.
3. Stop/quit EAC. Get an updated "cygwin1.dll". (You'll find a binary in an archive here (http://www.student.tugraz.at/thomas.plank/index_en.html), e.g..) Rename "cygwin1.dll" in EAC's subfolder "CDRDAO" to "cygwin1.old" or delete it. Unpack new "cygwin1.dll" to "CDRDAO".
4. Stop/quit EAC. Get and copy Ahead ASPI (ftp://ftp6.ahead.de/wnaspi32.dll) to EAC's folder. Start EAC, press "F9", select "Interface" tab and switch to "Installed external ASPI interface". Restart EAC and try again.
5. In EAC's menu select "File - EAC Options". Click the "Directories" tab. Switch to "Use this directory" and choose a directory you have write permissions for.
There's also a known bug with the EAC and the FLAC encoder where it will refuse to save the files to a remote network drive. This can be fixed by mapping a drive letter to said network drive which is outside the scope of this guide (google it).
Step 4: Post-Rip
So you're done!
One optional finishing touch would be to add a cover art image to the rip directory. Ideally at least 500x500 or 600x600. You can name it whatever you want but the preferred standard is simply to name it folder.jpg. Do not embed it in the music files. Just that file along with the music is enough for a majority of players to utilize.
Other than that, it never hurts to make sure your files are tagged and named properly (though they should be). Any extra stuff you want to include should be added now as well... Additional artwork, an md5 fingerprint, an info.txt file, that sort of thing. If you don't want to do any of that, it's time to find yourself an uploading guide!
-----------------------------------
For EAC setup instructions, use the guide found here (Thread 195866).
